- Purchasing of Wireless USB adapter
- Configuring of Host Access Point Daemon (HostAPD)
- Testing our Wireless Access Point
Process:
To set up the Wireless Access Point, we first needed a Wireless USB adapter which could act as a WiFi module. For such a purpose, we went shopping and eventually decided on TP-LINK 821N, a 300Mbps Wireless USB adapter.

This settled the hardware for our Wireless Access Point. Our next step was to configure the Wireless Access Point using HostAPD. First, we had to install the Wireless Access Point Driver on the Raspberry Pi's Linux kernel. Then, in the command line of the Linux system, we installed HostAPD and Dynamic Host Configuration Protocol (DHCP) packages. HostAPD is the package which would allow us to use the Wireless USB adapter as an access point, while DHCP is the package to configure the WiFi network.
First, we have to configure the DHCP server to with Static IP:
Command: sudo nano /etc/dhcp/dhcpd.conf (To edit the configuration File)
Add Following Lines:
subnet 10.10.0.0 netmask 255.255.255.0 {
range 10.10.0.25 10.10.0.50;
option domain-name-servers 8.8.4.4;
interface wlan0;
}
|
We then have to configure HostAPD. The code below configures the basic set-up of HostAPD, the name of the WiFi network, and authentication system of the network.
Command: sudo nano /etc/hostapd/hostapd.conf (To access HostAPD configuration Files)
#sets the wifi interface to use, is wlan0 in most cases
interface=wlan0
#driver to use, nl80211 works in most cases
driver=nl80211
#sets the ssid of the virtual wifi access point
ssid=dontMessWithVincentValentine
#sets the mode of wifi, depends upon the devices you will be using. It can be a,b,g,n. Setting to g ensures backward compatibility.
hw_mode=g
#sets the channel for your wifi
channel=6
#macaddr_acl sets options for mac address filtering. 0 means "accept unless in deny list"
macaddr_acl=0
#setting ignore_broadcast_ssid to 1 will disable the broadcasting of ssid
ignore_broadcast_ssid=0
#Sets authentication algorithm
#1 - only open system authentication
#2 - both open system authentication and shared key authentication
auth_algs=1
#####Sets WPA and WPA2 authentication#####
#wpa option sets which wpa implementation to use
#1 - wpa only
#2 - wpa2 only
#3 - both
wpa=3
#sets wpa passphrase required by the clients to authenticate themselves on the network
wpa_passphrase=KeePGuessinG
#sets wpa key management
wpa_key_mgmt=WPA-PSK
#sets encryption used by WPA
wpa_pairwise=TKIP
#sets encryption used by WPA2
rsn_pairwise=CCMP
#################################
#####Sets WEP authentication#####
#WEP is not recommended as it can be easily broken into
wep_default_key=0
wep_key0=qwert #5,13, or 16 characters
#optionally you may also define wep_key2, wep_key3, and wep_key4
#################################
#For No encryption, you don't need to set any options
|
The last configuration is the make sure HostAPD runs automatically with the booting up of the Raspberry P:
Command: sudo nano /etc/rc.local
auto wlan0 {
Iface wlan0 inet static
address 10.10.0.1
netmask 255.255.255.0
}
|
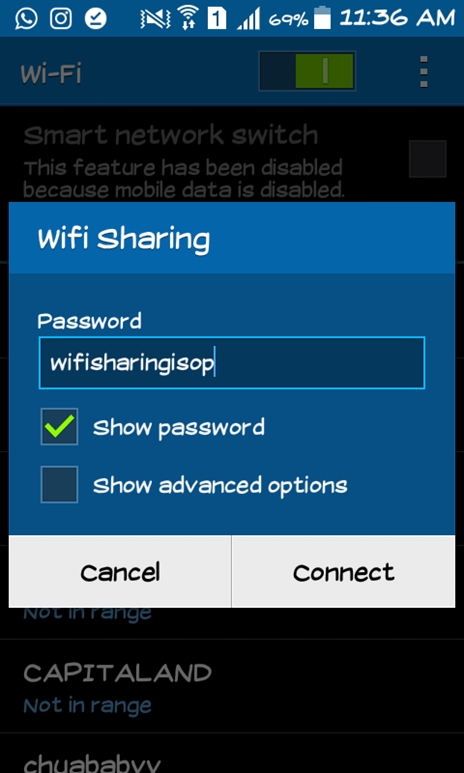
This is the final product:

Reflection:
The biggest takeaway from the setting up of this WiFi access point is the understanding that most programmers do not indeed code most of their code themselves. HostAPD, for example, is an open source programme and the configuration for both HostAPD and DCHP could be able to be found online. The main work done by programmers should be to understand and be able to read the code found online, as well as have the know-how to search for resources online.
Personal Development:
The setting up of this Wireless Access Point has better allowed me to understand the approach to learning coding that one should have. One should not aim to master every single portion of coding but should aim to be able to read, understand code, and source resources, latching on the work of other programmers before them.
No comments:
Post a Comment