Saturday, 27 August 2016

Creation of Webpage

Content:

- Components of Webpage


Process:

Registration and Login

Users are able to register an account by inputting their desired login information in the registration form. This data that is inputted from the registration.html will be put inside the MySQL database table.

The purpose of implementing a login function is to put in place a basic level of security, where only registered users can gain permission to upload and download files. Granted that all users are able to register and login of their own accord without need for permission from an administrator, such a system still allows the administrator of the MySQL database to check registered users. If the need arises, the code can be changed minorly to require the permission of the database administrator for registration.

When the user inputs his/her Username and Password into the login form, PHP code will be used to sent the input to the MySQL database. This input will be matched against the data of registered users to check the validity of the login information. If such a match happens, the user will be brought to the homepage, where uploading and downloading of files are allowed. If not, the user will be returned to the login page.

Login and Registration Form
sql.JPG
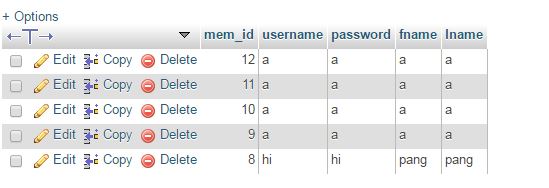
MySQL Database managed from phpMyAdmin

Upload

Users are allowed to upload their files by selecting a file from their device, whether mobile or with a computer. The upload code selects a file from the client-side device, placing it in the Apache server first as a temporary file. The code then proceeds to move the file from the temporary file into the directory of the Raspberry Pi. The file is saved with the same name as it has in the client-side device.


Download

Upload.JPGThe users are able to download the files straight from the homepage with the click of a button. Users are able to download all files, in the same format as it was uploaded onto the server.

We wrote the download code from scratch. The code is written such that PHP code will initiate a scan on the directory of uploaded files in the Raspberry Pi. This will return the filenames of uploaded files in an array. An echo function is then used to print the a list of filenames in alphabetical order. These filenames are linked to the file pathway of the file in the directory, and will launch a download for the user upon clicking.
download.JPG

Reflection:

Completing all of the individual components above has definitely not been a simple task. Although most of the code were sourced from online forums etc, we had to spend much effort learning and understanding the different languages. We also had to be able to interpret the different codes from many different sources, compiling it together to achieve the final product. However, the CSS code was all done on our own. We had to be able to put together a visually-appealing design for our webpage using different colours, and I am extremely glad the product turned out well. It felt extremely rewarding when we were able to write a working download code from scratch.

<?php
$FileNumber=0;
$directory="..\UploadedFiles";
// change $directory to the uploaded place
$FileToStop=0;
$File=array();
$File=scandir($directory);
$FileToStop=count($File);
$FileToStop=$FileToStop-1;
for( $FileNumber=2; $FileNumber<=$FileToStop; $FileNumber++ ) {
echo"<li><a href=$File[$FileNumber]>$File[$FileNumber]</a></li>";
}
?>


Introduction of Front and Back-End of Project

Content:

- Front-End

- Back-End

- Components of Webpage

Process:

The setting up of the web interface can be classified into the front-end and the back-end. The front-end of a web page is the presentation layer, the interface accessed by the user. The back-end refers to the data access layer, the database used to store information such as login information. The back-end is not accessible to the user.

The front-end of the webpage interface is mainly made up of HTML and CSS code.

HyperText Markup Language (HTML) is the standard markup language for creating web pages and web applications.  Web browsers receive HTML documents from a web server or from local storage and render them into multimedia web pages. In our case, our HTML code is stored on our local server, which is hosted on our Raspberry Pi. Besides from just the displaying the headers and paragraphs, HTML code was also used to create forms. Metaphorically, HTML code can be described as the skeleton of a webpage, the bare framework of the webpage.

Cascading Style Sheets (CSS) is a style sheet language used for describing the presentation of a document written in a markup language. It is used to set the visual style of the web interface. Due to the limitations of the Apache server, we could only make use of inline and internal CSS for our project. Metaphorically, CSS code can be likened to the clothes on a skeleton (HTML). It layers over the basic framework provided by the skeleton and beautifies the external appearance of the webpage.

I learnt both HTML and CSS from an online resource, W3Schools. W3Schools is a great online resource I found which offers lessons and quizzes for several programming languages. 

For the design of the webpage, I hosted the html file on my laptop, using my browser to get a preview of the webpage. Eventually with the inclusion of PHP code, the file was saved as a PHP file, which required the use of WampServer to preview.

MySQL was used as our back-end database to store the login data upon registration. Upon entering registration information in the registration form, the registration information will be saved in the MySQL database. This information will them be retrieved for authentication at login. phpMyAdmin is used to handle the administration of MySQL databases. 


Reflection:

Learning about the various front and back-end tools of webpages has given me a new perspective on webpages. I now understand what goes into a webpage when I look at one, and can even identify some of the coding done by several webpages to achieve their particular design. Many components must perform together to achieve the resultant webpage and it is definitely no easy task to design one. With guides and online courses however, such new skills and knowledge has surely become more accessible for everyone.

Personal Development:

Online resources has definitely helped me to quickly pick up a variety of new skills in both front and back-end, as well as understanding of servers. I will definitely continue to further my learning in the different languages, not just to improve the final product but to increase my knowledge and ability too. In the Digital Age today, I believe having the knowledge of how webpages, web servers, and the internet works can bring about many benefits in different aspects such as job-searching etc.


Setting up of Wireless Access Point

Content:

- Purchasing of Wireless USB adapter

- Configuring of Host Access Point Daemon (HostAPD)

- Testing our Wireless Access Point

Process:

To set up the Wireless Access Point, we first needed a Wireless USB adapter which could act as a WiFi module. For such a purpose, we went shopping and eventually decided on TP-LINK 821N, a 300Mbps Wireless USB adapter.
Image result for TP-LINK 821N

This settled the hardware for our Wireless Access Point. Our next step was to configure the Wireless Access Point using HostAPD. First, we had to install the Wireless Access Point Driver on the Raspberry Pi's Linux kernel. Then, in the command line of the Linux system, we installed HostAPD and Dynamic Host Configuration Protocol (DHCP) packages. HostAPD is the package which would allow us to use the Wireless USB adapter as an access point, while DHCP is the package to configure the WiFi network.

First, we have to configure the DHCP server to with Static IP:

Command:  sudo nano /etc/dhcp/dhcpd.conf (To edit the configuration File)
Add Following Lines:
subnet 10.10.0.0 netmask 255.255.255.0 {
range 10.10.0.25 10.10.0.50;
option domain-name-servers 8.8.4.4;
interface wlan0;
}

We then have to configure HostAPD. The code below configures the basic set-up of HostAPD, the name of the WiFi network, and authentication system of the network.

Command: sudo nano /etc/hostapd/hostapd.conf (To access HostAPD configuration Files)

#sets the wifi interface to use, is wlan0 in most cases
interface=wlan0

#driver to use, nl80211 works in most cases
driver=nl80211

#sets the ssid of the virtual wifi access point
ssid=dontMessWithVincentValentine

#sets the mode of wifi, depends upon the devices you will be using. It can be a,b,g,n. Setting to g ensures backward compatibility.
hw_mode=g

#sets the channel for your wifi
channel=6

#macaddr_acl sets options for mac address filtering. 0 means "accept unless in deny list"
macaddr_acl=0

#setting ignore_broadcast_ssid to 1 will disable the broadcasting of ssid
ignore_broadcast_ssid=0

#Sets authentication algorithm
#1 - only open system authentication
#2 - both open system authentication and shared key authentication
auth_algs=1
#####Sets WPA and WPA2 authentication#####
#wpa option sets which wpa implementation to use
#1 - wpa only
#2 - wpa2 only
#3 - both
wpa=3

#sets wpa passphrase required by the clients to authenticate themselves on the network
wpa_passphrase=KeePGuessinG

#sets wpa key management
wpa_key_mgmt=WPA-PSK

#sets encryption used by WPA
wpa_pairwise=TKIP

#sets encryption used by WPA2
rsn_pairwise=CCMP
#################################
#####Sets WEP authentication#####
#WEP is not recommended as it can be easily broken into
wep_default_key=0
wep_key0=qwert    #5,13, or 16 characters
#optionally you may also define wep_key2, wep_key3, and wep_key4
#################################
#For No encryption, you don't need to set any options

The last configuration is the make sure HostAPD runs automatically with the booting up of the Raspberry P:

Command: sudo nano /etc/rc.local

auto wlan0  {
Iface wlan0 inet static
address 10.10.0.1
netmask 255.255.255.0
}
This is the final product:


Reflection:

The biggest takeaway from the setting up of this WiFi access point is the understanding that most programmers do not indeed code most of their code themselves. HostAPD, for example, is an open source programme and the configuration for both HostAPD and DCHP could be able to be found online. The main work done by programmers should be to understand and be able to read the code found online, as well as have the know-how to search for resources online.

Personal Development:

The setting up of this Wireless Access Point has better allowed me to understand the approach to learning coding that one should have. One should not aim to master every single portion of coding but should aim to be able to read, understand code, and source resources, latching on the work of other programmers before them. 


Setting Up for Success

Content:

- Setting of Clear Project Parameters

- Learning of New Skills and Languages Necessary for Project

- Planning of Project Framework

Process:

Due to the Technopreneurship courses in the previous weeks, my team has not made the effort to embark on our project proper. We hence took the opportunity this past few CID lessons to put up clear parameters for the objectives of our CID project. The setting up of this scope can help us ensure that we remain on task during the course of our project and have a clear goal in mind. With the planning of our project parameters and framework, we were also able to get a clear overview of the workings of our Offline Database Server.

Our Offline Database Server mainly consists of two parts, the Wifi Hotspot and the Server (including the webpage). We hence decided on such a framework for our project to run on in the end.


We planned to use Host Access Point Daemon (HostAPD) for the setting up of the Raspberry Pi as an access point. This access point would allow users to connect by WiFi to the Raspberry Pi, hence being able to access the webpage in the server through entry of the IP address of the Raspberry Pi in the browser.

For the server, we planned to use of a LAMP (Linux, Apache, MySQL, PHP) Server. On the Linux operating system of the Raspberry Pi, we would the Apache HTTP Server, a web server software 90% of the world's webpages run on. We would then install MySQL for a database, and PHP as our server-side scripting language to handle data storage in our databases.

For the webpage hosted on our server, we would use HTML for the basic framework of the webpage, and CSS for the visual style of the web interface. Reflection: Upon the deciding of our project framework, we immediately understood the level of difficulty that it brought. The use of HostAPD was something we had never come close to using before, and there was a lot to understand about implementing the HostAPD: the initial hardware requirements and the process. The use of LAMP was also new to us. We were completely new to setting up of a server, as well as the maintenance of a database and the PHP programming language. Even HTML and CSS had to be learnt from scratch. This was definitely a whole new challenge for us -- in all sense of the word. We have a tough journey ahead, but a great journey of learning too for sure. Personal Development: I immediately set up to compile a list of book and online resources which would help me pick up the new knowledge necessary for the project. I decided to mostly use online resources such as W3Schools to pick up knowledge as online resources are far more versatile and convenient, even offering quizzes to the students to test their abilities. Books from the library, on the other hand, can only be held for 3 weeks and cannot be constantly used as revision as reference after use.
 

Friday, 26 August 2016

Final Project Idea

Content:

- Brainstorming up to Final Project Idea

- Confirmation of Final Project Idea

Process:

Upon having our first project idea rejected, my team and I continued to think about various different ideas. However, it was extremely difficult for us to decide on a project which we felt was sufficiently difficult for us to tackle. We wanted to take on a more challenging project which would force us to pick up many new computing skills and knowledge such as the use of different languages. We also had more than a term to work on our task and hence wanted to pick one which could occupy us for the whole period of time.

This difficulty in picking our project persisted until Mr Chan and Mr Zhou introduced us to a project done by another group of students in Korea. This group of students were able to turn the Raspberry Pi into a Wifi router, which would open up many other possibilities of the Raspberry Pi. We decided to expound on such an idea eventually to solve a big problem: the need for internet connection to share files and information during instances such as OELP trips.

To combat such a problem, we decided to turn our Raspberry Pi into a Wifi Router too. Our Raspberry Pi would host a server, which would allow users to upload and download files through a webpage. This could circumvent the lack of internet connection as the devices would not require access to a server through the internet.

Reflection:

This task we have assigned to ourselves would be a tough one to face as it would require much knowledge that we do not yet have. Many of the languages needed to complete this task, as well as server-side configuration are still relatively new to us. However, I can confident that we would be able to complete the task, picking up many new skills along the way. I am sure that we will be able to learn much from such a project and I look forward to embarking on our task.

Personal Development:

I understand that due to my inexperience in many front-end and back-end languages, I would have much to learn. I look forward to planning out the specifics of our project with my teammates so that I can embark on my learning using online resources such as W3Schools, which has been extremely helpful in my journey of enrichment thus  far.